4 Fab Beauty Products I’m Loving Right Now

It’s been a while between beauty posts, so I thought I’d bring a little lightheartedness to our Friday and share with you a few products that are kicking some serious goals for me at the moment.

1. Mario Badescu Drying Lotion

Ok, how come no one told me about this stuff?

All right, all right, so all the beauty eds do tend to bang on about it and I guess it’s my own fault for holding out, but seriously, let’s just say… AHH-MAZING.

My skin has always been pretty well behaved, bar a few hormonal pimps every month, but after our wedding, it seemed to go through some sort of post-traumatic stress disorder issshue and I ended up with a couple of painful, red, ugly-as-hell pimples (lumps?) on my chin, which certainly made this newlywed feel rather stunning. Not.

I’d like to say I didn’t touch them at all but that would be a lie and I’d never lie to you guys, so I’ll instead tell you the real story: I spent several mornings and evenings lathering myself in every product in my beauty cupboard and prodding my lumpy foes with my tweezers (yes, really) and the result was… nothing. No change.

Until Mario came into my life early last week. Mario, my hero. My sweet, sweet, hero in a bottle.

After applying the solution with a cotton tip before bed, the angry little bumps basically disappeared and I was left with a teensy bit of dry skin (which went away once I  moisturised) and after one more day of dabbing – once in the morning, once at night – the spots were gone. Cue champagne corks flying everywhere!

I’ve tried pimple clearing gels in the past and it has seriously taken a month for the red spots* left after using the gel to disappear. I’m also not a fan of the way they seem to burn your skin a little. Has anyone else found that?

This stuff, however, is completely different. My gels actually went straight to the bin once I saw it work its magic, and at $26.95, I think it was money very well spent.

If you’re keen for a bit of Mario action yourself, you can find him hanging out at Kit Cosmetics. Or with Luigi.

* Just on the post-pimple red spots, the best way to get rid of them is to apply Clinique’s Even Better Clinical or any other cream aimed at reducing pigmentation – with vigour.

2. Too Faced Better Than False Lashes

This product will totally wig you out. Wiggy wiggy wigggyyyy.

What you do: apply a base coat of the mascara, followed by a coat of what I’ll call cotton-wool but is in actual fact, Flexistretch nylon fibres (pardon me). Finish up by layering on another coat of mascara and watch on in wonder as your lashes are magically transformed into Totally Luscious Works of Art.

If you’re after length, this baby will deliver by the truckload, but… and there’s a but… if you like length AND thickness (you greedy little thing, you) you might find you have to put on another coat of another mascara like I did (Giorgio Armani Eyes to Kill, FYI).

It all depends what you’re after, but using this product is definitely the closest you’ll get to the length of lash extensions without actually getting lash extensions. It’s a girls-night-out-on-the-town superstar.

3. Trilogy Rosehip Oil Antioxidant +

Something happens when you’re a long time rosehip oil devotee.

If you fail to purchase a new bottle and go a week or two without it, your skin almost goes into shock. The punishment of course is that it gets all lacklustre and kinda meh and those expression lines under your eyes look decidedly deeper and OH HEY, FOREHEAD CREASE, are you new around here?

That’s what happens to me anyway. Especially in winter.

Thankfully, I’m fully stocked again on the rosehip front and I have to say that I now bypass the regular Trilogy oil for the fancy advanced formula Rosehip Oil Antioxidant +.

Why? Because Trilogy can do no wrong in my eyes, and if they’re ramping things up, then so am I. That’s all there is to it.

4. Dove Foaming Make-Up Remover

I bought this on a whim the other day as I’m still waiting for the perfect cleanser to jump off the shelf and into my heart (suggestions gratefully appreciated here my loves) and I have to say that I’m digging it.

I’m too lazy to do the whole remove-eye-makeup-and-then-cleanse scenario – with two different products, I mean – so any makeup removing product I used has to tick one very big box: it can’t sting my eyes, as it goes straight from the bottle, right onto my whole face. 10 points for Dove on that front – zero stinging is a big win.

I also love products that leave my skin feeling hydrated and smooth, not tight and squeaky, and I’m pleased to say this one does the former for me. Once I find a cleanser I can have a long-term love affair with, I’m sure it will take a backseat, but for now, it’s a keeper.

Do you have a favourite moisturiser/ cleanser/ serum/ mask/ hair treatment? I know we all love to try a great new product, so let’s unleash some love in the comments (also referred to as: shopping list time!).

Answer me this: what beauty products are you digging right now?

IF YOU ENJOYED THIS POST, I’D LOVE YOU TO SHARE IT USING THE BUTTONS BELOW. Merci! x


Invisalign: A Review

I was asked ever-so-nicely by a few readers on Instagram to recount all the juicy details of my experience with Invisalign, so hold onto your dental floss, we’re about to talk teeth!

Invisalign are essentially clear, plastic mouthguards that move/ straighten/ work wonders on your teeth in the same way that traditional metal braces do.

They’re not for everyone for a number of reasons (cost, the fact some people need metal braces to correct other issues such as severe overbites, for example) so let me start by saying that if you’re interested, it’s best to chat to both your regular dentist and book an appointment with an orthodontist to see if these extraordinary pieces of plastic will do what they need to do for you.

* Just on that, my dentist told me they wouldn’t work for me and I think he’s still full from eating a big ol’ piece of humble pie yesterday when I went for my 6 monthly clean!

Why I Got Them


Shown: wearing my Invisalign, one month after getting them. 

I didn’t have braces as a teen as I was lucky to have straight teeth… that is, until my wisdom teeth came down about 5 years ago in my mid-twenties and things started really moving. Overcrowding became a big issue, and I noticed that one of my front teeth was starting to cross over the other, along with some noticeable movement with the teeth on each side and my middle bottom teeth. I’d also started pushing (“thrusting” is apparently the technical term but… wow) my tongue up against my front teeth quite aggressively when I was sleeping. See what I mean? Aggressive thrusting, and… OKAY THEN.

Where were we?

Anyway, when I mentioned my toothy predicament to friends or Ramai, they’d laugh and say “Your teeth are fine” but then I’d show them a photo and they’d say “Oh, yep, I get it now” and with a wedding on the cards – ergo, photos a-plenty – it was decided that off I would trot to get fitted for what became affectionately referred to as my “Vizzy’s.”

The Process*


Shown: wearing Invisalign, 2 months in. 

+ Impressions, X-rays and photos are taken of your teeth and are then turned into a 3-D image so you can see the kind of results you’ll get. At this point, you pay a deposit, which for me was around $3000. The Invisalign cost me $8000 in total which I paid in montly installments.

+ At your first fitting, you’ll be shown how to get the trays in and out of your mouth as you take them off to eat and drink hot drinks. If you’re anything like me, you’ll probably think THERE’S NO FREAKING WAY I’M GETTING THESE BAD BOYS ON AND OFF BY MYSELF, but then after playing in the mirror at home, you’ll get the hang of it quick sticks. Promise.

+ You’re then given a batch of trays that need to be changed every fortnight, and for the first day or so, you’ll feel some pain and sensitivity as they start to whip your teeth into line. I had mine on for 12 months all up and I found for the first 6 months I really noticed a dull ache for the first day of a new set (sometimes randomly, mostly after I’d put them back in after having them out to eat), but later on in the process, when my teeth were more mobile, I’d whip them in and out like nobody’s bizness with very little pain at all.

My hot tip here is to put your new ones on at night so the movement begins while you’re sleeping.

* may vary depending where you get them done. I got mine at Gullotta Orthodontics on the Gold Coast (very professional, highly recommend).

The Rules + Other Stuff


+ You need to wear your Invisalign for 20 – 22 hours a day, which means popping them out to eat, rinsing your mouth out and then getting them straight back in. Because I’m a nerd and did just that, if I had a party or a work dinner where I couldn’t pull them in and out repeatedly without looking disgusting (Oh, don’t mind me just fishing around in my mouth at the table, guys!) I’d just keep them out for a block of a few hours. Which is OK sometimes, but should not be “the norm” if you want them to actually do what you hope.

+ To clean: you’re given a special coarse brush and told to clean the aligners every morning and night with mouthwash, but I found that towards the end of the 2 weeks before I was about to pop in the new set, they would get rather UGH, so I soaked them in Steradent denture tablets which worked an absolute treat.*

+ Attachments: or as we called them, “shark fins.” These are small and tooth-coloured and applied to any teeth that need extra assistance to move (they create more friction/ tightness between the aligner and your teeth). They do make it harder to get the trays in and out of your mouth at first, but you get used to them. They also make your Invisalign slightly less “invisible” but remember, no one notices them as much as you – in fact, lots of people never even knew I had them on.

+ Elastics: like the sharkeys, I wasn’t the hugest fan of the elastics and thankfully they were only on for a short period of time. These are to encourage faster movement, and honestly, once you’re into the process, you just want to do everything you can to help achieve an amazing result.

How these work: small buttons are attached to your back teeth (bottom ones) and slits are made in the top aligners towards the back. The tiny elastics then slide into the slits and are wrapped around the buttons to create more tension.

* Not recommended in the manual, but I found this to work well if used occasionally.

A.I (After Invisalign)


Taken straight after my last orthodontist appointment! 

I finished my 12 month treatment 2 weeks ago and part of ensuring my teeth stay as straight as they now are means I have a bar stuck behind my upper and lower teeth, and I have to wear a plastic mouthguard (retainer) to bed every night for the first 6 months, and eventually once a week (forever). Of course, that’s up to me, but after doling out the cash and being super vigilant for the past year, you can bet I’ll doing everything I can to keep them in line, so to speak.

Why I Loved Them


Straight teeth on our wedding day = hooray!

Don’t laugh, but I actually grew quite fond of my Vizzy’s. I think it was the psychological aspect of knowing that when they were on they were working their magic, but I think most importantly, I loved that I could see them moving and straightening as I went along.

I love food and was stoked that I didn’t have to cut anything out of my diet like you do with regular braces (well except chewing gum, but it’s no good for you anyway). I also have to admit that the fact I could pretend I wasn’t in the middle of a teeth straightening adventure if I needed to (like at my birthday soiree, for instance) was a pretty big win, and something that you can’t say about our friend Mr Metal.

So that’s it, a totally unsponsored, completely honest account of my experience with Invisalign. I hope that answers a few questions!

+ What about you – have you ever had braces? What did you think of them? Have you ever thought about Invisalign?


4 Cheap & Cheerful Beauty Buys That Actually Do What They Promise!

Bank account looking a little sad after the annual Christmas spend-a-thon, but you’re (literally) scraping the bottom of the barrel/ bottle/ tube of your favourite beauty products?

Never fear, my friend, I’ve found a few ‘cheap and cheerful’ goodies, and if you’re all about bang for your buck when it comes to beauty, I’ve got a feeling you’ll be as pleasantly surprised as I was!

* Excuse the ridiculous photos. Not my finest… obviously. Carry on. 

1. Garnier PureActive ExfoBrusher $11.99

I love a good novelty product, particularly if the funny roll-y knob or – in this case – crazy spiky head, is actually useful.

The idea behind the ExfoBrusher is that the soft flexi-bristle head gently yet deeply cleanses to reduce excess oil and nix blackheads. The formula contains 2% Salicylic Acid which helps remove dead skin and unclog pores, and, trust me on this – your face will seriously never feel cleaner than after to you use it.

I generally use this cleanser in the shower by wetting my face first, then wetting the brush, squeezing the bottle a little until some of the product comes out and then scrubbing my face by moving the head around in a circular motion.

I’m a huge fan of face massages and this is as close as you’re going to get without keeping your facialist on a weekly retainer.

2. Lush ‘Vanillary’ Solid Perfume $10.95

They call this one a “grown up gourmand” perfume and I have to agree. It’s super vanilla-ish, no doubt, but it’s not a flirty, sickly sweet, celebrity-scent kind of vanilla (if that makes any sense at all). Basically, it’s amazing and totally swoon-worthy and men will probably drop at your feet if you wear it. For real.

If you’re thinking of buying one for yourself, I’ve got both the spray version and the solid perfume, and I prefer the latter because it’s not as overpowering strong. Great little gift too, and the perfect size to pop in your sparkliest party clutch!

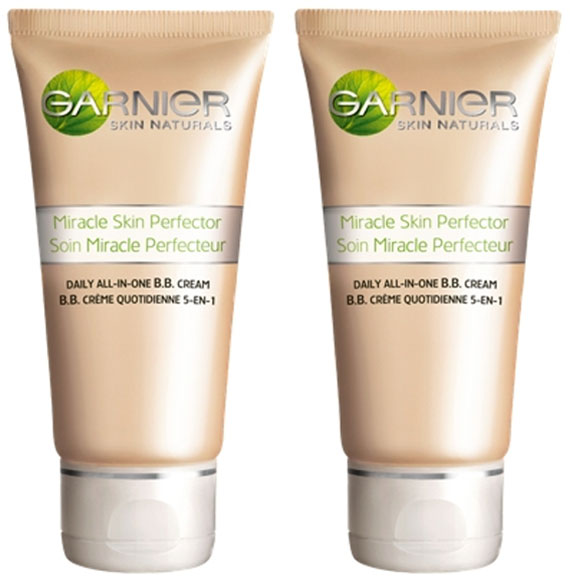
3. Garnier Miracle Skin Perfector BB Cream $13.95

I picked up Garnier’s BB Cream over the Xmas break after hearing a bunch of beauty bloggers rave about it (what can I say, I’m a sucker for a bit of mad marketing hype) and I’m kind of in love with it!

The idea behind this bad boy (perhaps that’s what’s BB stands for?) (kidding guys, its Blemish Balm) is that it combines the best of skincare and the benefits of makeup, and for under $15, I can tell you that its definitely punching way above its weight. The cream is quite thick and nice and dewy – which is how I like it – and I adore that it evens out my skin tone, whilst giving my face a nice blast of radiance. Winner.

Garnier’s BB Cream is essentially a tinted moisturiser (on steroids) so I’ve been wearing it alone on weekends and mixed with a drop of foundation during the week for a little more coverage. For reference, I bought the Medium shade but it also comes in Light. It contains an SPF 15+ and while 30+ would be better obviously, some protection is better than none at all (note: I always apply a separate 30+ even if the product does have sun protection – one can never be too careful!)

In summary: if I had to describe the way this Miracle Skin Perfector will leave your skin looking in one word, I’d say ‘luminous.’ And who doesn’t want that for the price of a takeaway stir-fry?

4. Rimmel London ‘I Love Lasting Finish’ Nailpolish in Wine Not $5.95

I keep my nail polish in the fridge and there’s one shelf in the door that’s positively bursting at the seams with colourful polishes, ranging from pale, pale pinks to the blackest black. And yet, in that lovely collection, I didn’t have a decent wine/ mulberry coloured polish for some reason, so I grabbed this one in a rush from Priceline before my work Xmas party at the end of last year.

I’ll admit to throwing it in my basket thinking it would be good for a few hours and then my nails would be chip-central, but the price was ridiculously good so I didn’t really mind.

How wrong I was! Not only is the colour perfect, but this nail polish actually lasts longer than some of my $20 polishes – and dare I say, the consistency is totally on par. I’ve been wearing it to death since I bought it and quite a few people have complimented me on the colour, which is always welcome.

Wanna get vampy with it too? ‘Wine Not’ I say.

* Note: these aren’t my nails, pic from here.

+ Have you picked up any beauty bargains lately?


How to Organise Your Beauty Products!

Happy New Year my loves, I hope 2012 has been treating you magnificently so far!

Regular posting will resume around here next week but I wanted to quickly share with you my brand spankin’ new makeup storage unit.

I had a major organisation day yesterday and tackled my bathroom cupboards with vigour, throwing out a bunch of old makeup, half finished lip gloss tubes and tubs of face cream that had but a skerrick left in them.

Inspired by this post, I decided I too needed something fabulous to store my new pared-down collection in, so I headed to Office Works and found this clear perspex 4 drawer treasure, which came in at a very affordable $14.99!

I love that I can see everything in one place now and that I’ll be forced to keep my beauty loot clean and in order because it’s all on display in our bathroom.

+ What do you think? Are you in super organiser mode at the moment too? How do you store your beauty products?

UPDATE!

I’m so crazy about these trays I decided to organise my jewellery too! Thinking they’d also be great for spices or condiments in the kitchen (the possibilites are endless).


Holy Health: Things I’m Doing to Get My Glow On

Hands up if you love glowy skin and feeling damn good? Excellent. Me too (times infinity) and I’m going share with you what I’ve been doing lately on the beauty and health front that’s helping me ramp up the glow factor.

1. Sodashi


I mentioned recently that I’m on the quest for some new beauty products, so after a goodie box of Sodashi samples made it’s way to me a few weeks ago, I was absolutely thrilled, to say the least.

I’d heard great things about Sodashi (which sounds like something an excited Harajuku girl would squeal – “Sodashi! Sodashi!” – but actually means “wholeness, pureness and radiance” in Sanskrit) and knew that their products were chemical-free and made from natural ingredients, so I ripped the box open and started applying the products straight away. As you do. If they’re good enough for some of the world’s most exlcusive spas in the Paris and New York, they’re most certainly good enough for me!

This is what I’ve been testing out:

1. Calming Rose Face Mist

This spray smells like a dream and although I generally only use face mists on long-haul flights, I’ve been giving myself a little spritz twice a day and delighting in the experience. The idea behind face mists are that they’re supposed to refresh and uplift so I’ll be bringing this one on my flight to Melbourne today to do just that. Smells IN-CRED-I-BLE.

Full details on ingredients and price.

2. Clay Lime Cleanser

This one gets major points from me for one very simple reason – you can rub it all over your face, including your eyes, without running around the bathroom like a screeching Banshee, arms flailing as you reach for a towel to “take the stingy away.” Does anyone else do this when you forget the product you’re using isn’t suitable for rubbing over your eyes? Hate that. Anyway, I’m pleased to report that this clay cleanser is totally sting-free and sinks into your skin beautifully. The texture is amazing and you’re left with a clean (but not tight) face. I’ve also noticed it seems to brighten my skin as well, which is a big fat bonus!

Full details on ingredients and price.

3. Rejuvenating Face & Neck Moisturiser

I’m loving this so much I just ordered another bottle because I can’t bear the thought of my sample running out and being left without this product. It’s THAT good. It’s funny because I love quite oily/ thick moisturisers (of which this is neither) but I’m finding my makeup is staying better now and it has most definitely helped with smoothing and brightening the skin on my face. I don’t want to brag too much but I feel like my expression lines under my eyes are plumper and less noticeable too. THIS is why I’ve ordered more. Oh, and it smells divine!

Full details on ingredients and price.

4. Rejuvenating Concentrate

I wasn’t sure if this would impinge on my super-speedy beauty routine so I was a bit dubious about this concentrate at first, purely because I’m a whip it off and whack it on kinda girl when it comes to cleansing and moisturising. HOWEVER, I didn’t need to worry as this only adds about 40 seconds to your overall routine and is completely worth it. Trust me.

What you do: Fill your basin with warm water and add 10 drops of Rejuvenating Concentrate. Soak a face cloth in the solution, squeeze out excess water and then apply to your face. I like to hold it on quite firmly, the way they do when you have a facials. Repeat your affirmations in your head as you do so – it adds to the experience.

What it does: Um, magical things! The Rejuvenating Concentrate actually gently exfoliates as well as rejuvenating, so it’s great for skin renewal and helps with scarring and pigmentation. Super stuff.

Full details on ingredients and price.

2. Ultraceuticals

I’ve recently started using Ultraceuticals Even Skintone Serum  in place of my Clinique Even Tone Clinical (which I also love and highly recommend) and it’s working a treat!

I’ve been applying it after I cleanse, under my night cream for the past two weeks and I’ve definitely noticed it lightening up some of the more noticeable pigmentation on my face. The curse of living in Queensland is that we’re so much more susceptible to sun damage and with my wedding coming up, I plan on doing everything I can to even out my skin. This serum is staying in my kit for sure.

I’m still using my all-time favourite serum, Trilogy Rosehip Oil in the mornings and I use this one at night.

 3. Big ‘Everything’ Salads


This salad we made the other night is THE BOMB and I’ve been trying to incorporate these big “throw in everything” type salads more and more in our diets.

This one had:

+ Roast pumpkin – roasted in coconut oil and turmeric
+ Spinach
+ Snow peas
+ Tomato
+ Fetta
+ Avocado
+ Alfalfa
+ Walnuts
+ Chia seeds
+ Red onion

Dressing

+ The salad with firstly dressed with a bit of avocado oil, then topped with a mix of natural yoghurt, mint, lemon and cayenne pepper. YUM!

4. Exercise Motivation


Women’s Health magazine had a great deal recently where you could subscribe for 12 months for $69 and also receive their Big Book of Exercises as a freebie. I’m a big believer in reading to educate and get motivated, and I love the way Women’s Health pull together relevant health information without being “preachy” (or worse still, calorie/ fad diet obsessed).

So glad I’ve got this highly informative book of exercises now and I’m going to make up some new (hardcore) routines for my training buddy and I to tackle next week. I also bought some new exercise gear (lululemon and Lorna Jane make the best stuff in my opinion, girly and functional all at once) because apparently new gear makes you run faster. Ha!

+ What about you? What are you using/ eating/ doing at the moment that’s making you feel and look fabulous?


Beauty Interview on bellaMUMMA

A quick (exciting) note!

Gorgeous Nikki from bellaMUMMA contacted me a few weeks ago to see if I’d like to be interviewed for one of her ‘Glow & Tell’ posts.

My response, of course, was ‘YES I’D LOOOOVE TO!’ as I’m a huge fan of bellaMUMMA. If you haven’t yet come across this stunning site, I highly recommend spending some time looking through the archives – Nikki finds the most incredible images and mixes them up with lovely words on life and beauty, which I know you all love!

In my Glow & Tell feature I talk about my favourite beauty products and tips, so head on over to bellaMUMMA today to check it out.

Huge thanks again to Nikki for featuring me! xx


5 Hair Products I’m Currently Loving

I’ve posted previously on the skin care products and fragrances I adore, as well as my makeup essentials, so today I thought I’d share a few of my favourite  hair products:

1. Redken All Soft Treatment


This little gem is a mainstay in my hair care arsenal. Believe me when I say, over the years I have tried more hair treatments than you can poke a curling wand at and out of them all, I have to say this is the one that works best for me. I wash my hair every second day and I use this in place of a conditioner (I only leave it in for about 2 minutes) because I’m hooked on how soft it leaves my hair. When I say soft, I mean light (not weighed down, which is a must for me as I have a lot of hair) and really hydrated. If I remember, once every few weeks I pop a big dollop in, wrap a towel around my head and let it work it’s magic for at least half an hour. Perfect for dry, tired locks! (Not sure why hair would be tired, but that’s what the ‘pro’s’ say on the ads, so I’m rolling with it).

Redken have a substantial range that tackle a plethora of hair woes, and you can take this as my wholehearted recommendation – give them a go! I recently thought I’d mix things up and went back to one of my old faves, Kerastase’s Resistance Age Recharge, but honestly, I prefer the Redken. And it’s half the price (the All Soft treatment comes in at $35) which means more cold hard cash for other important things like our wedding fund lip gloss.

2. Goldwell Kerasilk Shampoo


I’m not fussed on shampoo and will normally use brands like Dove, Sunsilk, Loreal or occasionally the Redken All Soft shampoo. I recently picked up the Goldwell Kerasilk and it appears to be doing what it’s supposed to.. which, I’m guessing is cleaning my hair? Ha! What else can I tell you? To me, shampoo leaves your hair feeling so-so unless you team it with a conditioner or treatment (would you say so too?) so it’s hard to judge it on it’s own, although this one does leave my hair feeling silky. The only people I’ve come across who love using shampoo without conditioner are aliens men. Apparently it makes their hair too “fluffy.” Righto. Where was I again? Moving right along…

3. Moroccan Oil (soon to be replaced with Pure Argan Oil)


I started using Moroccan Oil when my ends were really blonde (balayage) and although they’re not as light anymore, I still have highlights through the majority of my hair and the oil keeps it feeling silky smoooooth. I’ve recently read a bit about Moroccan Oil being full of silicone, and I know the other products I’m using are probably much the same, but if I can minimise the toxins from somewhere, this seems like a good place to start. Apparently health food stores sell Pure Argan Oil (which is much cheaper too – bonus!) so once my bottle of Moroccan Oil runs out I planning on switching to the pure stuff.

For use: I rub a five cent piece-sized amount in my hands and kind of pat it through the mid-lengths (and down to the ends) of my hair while it’s wet. Then I run my fingers through all my hair to spread it evenly. Great for smoothing frizziness and I find I get a much nicer blow dry when I use it. Looking forward to trying out the pure stuff!

4. Kerastase Oleo-Relax Serum


Much the same as Moroccan Oil, Kerastase’s Oleo-Relax Serum is a oil that smoothes frizzies and leaves my hair nice and shiny. I’ve had my bottle for ages as a little bit goes a long way, and I because I’m using Moroccan Oil in wet hair, I just use a teensy bit of this to smooth any fly-aways after a blow-dry. Lovely product if you want to splurge, but for a serum that won’t break the bank and will do essentially the same thing, I recommend Schwarzkopf’s Zero Frizz serum (can’t find a picture anywhere, but it’s about $9.95 from the supermarket).

5. Batiste Dry Shampoo


If you haven’t heard of dry shampoo, I’m about to change your life. Brace yourself. Yes ladies, some genius has come up with a product that will fix that greasy, desperately-in-need-of-a-wash hair you find yourself freaking out over when you realise that in 3 minutes time you should be racing out the door to get to work/ meet your date/ party the night away with the girls. Batiste is my favourite. I don’t spray it straight on my part – I either spray on my fingers and rub through or kind of lift up pieces of hair and spritz underneath, then mess it all through.

Dry shampoo is also perfect for nixing that “sweat halo” you get after a strenuous gym work out (who can be bothered waiting for the hairdryer at peak hour in the mornings at the gym?) I use the original version but I see they have a brunette version now too so I’ll switch to that next time. Have you ever used dry shampoo, and if so, what do you think of it?

+ I love, love, love product recommendations so tell us in the comments what you’re using! What are your must-have, can’t-live-without hair products?